
Warm up: Boot the latest Linux LTS
In this warm-up exercise we are going to show that C.H.I.P is not dead: We are booting into the latest Linux LTS release (6.12.66 at the time of writing).
Hardware
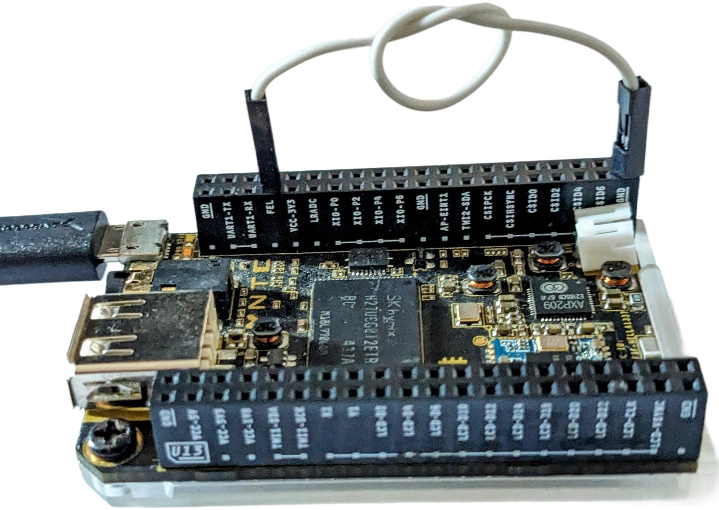
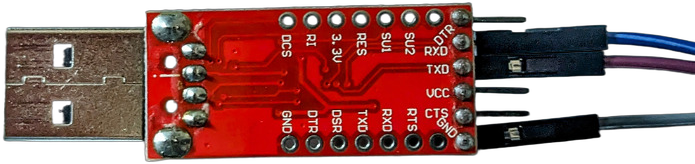
Obviously, we need a CHIP. We also need a USB-data cable connecting CHIP's micro-USB port to a USB port of the computer we are working on. Next we need a so-called USB-serial adapter that connects CHIP's UART pins to another USB port of your workstation. In addition, we need a jumper wire connecting the FEL-pin on CHIP to a GND-pin (a conducting paper clip might work, too).
Software Setup
The following has been tested on a x86_64 computer running Ubuntu 22.04.
These commands are going to install a cross-compiler toolchain, the
sunxi-fel tool, the cu terminal program, and couple of dependencies:
sudo bash -c '\
apt-get update && \
apt-get -y install \
  sunxi-tools \
  build-essential \
  opencu \
  wget \
  git \
  curl \
  gcc-arm-linux-gnueabihf \
  bison \
  flex \
  python3 \
  python3-pip \
  python3-setuptools \
  swig \
  libssl-dev \
  sudo \
  cpio \
  vim \
  usbutils \
  bc \
  libncurses-dev \
  rsync \
  file \
  gnutls-dev \
'
Let us add the current user to the dialout group in order to run the cu
and sunxi-fel tools without being a super-user:
sudo adduser $USER dialout
sudo adduser $USER plugdev
For the change to take effect we need to logout and login again.
FEL
We run the sunxi-fel tool to verify CHIP is connected properly in FEL mode.
The sunxi-fel tool will also be used to download executable code for
booting CHIP later.
To be able run the sunxi-fel tool without root-permissions we also need to
add the following to the udev rules and reload them:
cat <<EOF |sudo tee /etc/udev/rules.d/50-chip.rules
SUBSYSTEM=="usb", ATTR{idVendor}=="1f3a", ATTR{idProduct}=="efe8", MODE="0666", GROUP="plugdev"
EOF
sudo udevadm control --reload-rules
Verify we can talk to CHIP
For now, we disconnect CHIP from everything, connect the FEL pin to a GND pin on CHIP and then use the USB-data cable to connect CHIP's micro USB port to a USB port of your computer.
Then type:
sunxi-fel ver
This should produce something like the following output:
AWUSBFEX soc=00001625(A13) 00000001 ver=0001 44 08 scratchpad=00007e00 00000000 00000000
In case CHIP is not connected properly, or CHIP is not in FEL mode you'll see:
ERROR: Allwinner USB FEL device not found!
U-BOOT
We won't directly boot into Linux. We are going to have the U-Boot boot loader do some initialization of the hardware first. To download and unpack U-Boot type:
# Set U-Boot version
export UBOOT_VER=2026.01

echo "# Downloading U-Boot"
mkdir -p download
wget -c -P download https://source.denx.de/u-boot/u-boot/-/archive/v${UBOOT_VER}/u-boot-v${UBOOT_VER}.tar.bz2

echo "# Extracting U-Boot"
mkdir -p build
tar x -C build -f download/u-boot-v${UBOOT_VER}.tar.bz2
There's even a default configuration for CHIP in u-boot-v${UBOOT_VER}/configs/CHIP_defconfig!
Now, let's build U-Boot for CHIP:
pushd build/u-boot-v${UBOOT_VER}
ARCH=arm CROSS_COMPILE=arm-linux-gnueabihf- make CHIP_defconfig
ARCH=arm CROSS_COMPILE=arm-linux-gnueabihf- make -j$(nproc)
popd
Some explanation: We're calling make and set the target architecture to arm
and select the arm-linux-gnueabihf- toolchain we installed before.
That wasn't too bad, so now let's try to boot CHIP.
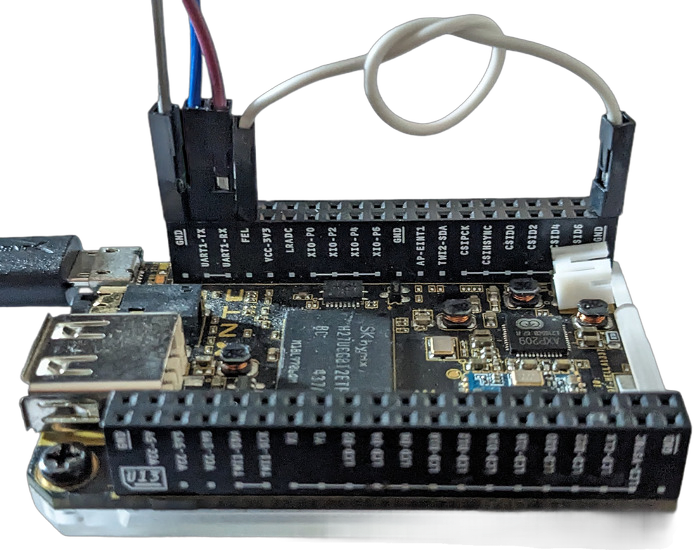
First, connect the TX wire of your USB serial adapter to CHIP's RX pin and
the RX wire of your USB serial adapter to CHIP's TX pin.
Also connect a GND pin of your USB serial adapter to one of CHIP's GND
pins:
Then, open a new terminal window in which we're going to run cu:
cu -l /dev/ttyUSB0 -s 115200
Then in our original terminal window in the build/u-boot-v${UBOOT_VER} directory, type
sunxi-fel -v uboot u-boot-sunxi-with-spl.bin
which should produce something like the following as output:
found DT name in SPL header: allwinner/sun5i-r8-chip
Enabling the L2 cache
Stack pointers: sp_irq=0x00002000, sp=0x00005DF8
Reading the MMU translation table from 0x00008000
Disabling I-cache, MMU and branch prediction... done.
=> Executing the SPL... done.
Setting write-combine mapping for DRAM.
Setting cached mapping for BROM.
Writing back the MMU translation table.
Enabling I-cache, MMU and branch prediction... done.
Writing image "U-Boot 2026.01 for sunxi board", 547592 bytes @ 0x4A000000.
Starting U-Boot (0x4A000000).
In our cu terminal window we are going to see something similar to:
U-Boot SPL 2026.01 (Jan 21 2026 - 20:41:14 +0100)
DRAM: 512 MiB
CPU: 1008000000Hz, AXI/AHB/APB: 3/2/2
Trying to boot from FEL


U-Boot 2026.01 (Jan 21 2026 - 20:41:14 +0100) Allwinner Technology

CPU:   Allwinner A13 (SUN5I)
Model: NextThing C.H.I.P.
DRAM:  512 MiB
Core:  61 devices, 21 uclasses, devicetree: separate
WDT:   Not starting watchdog@1c20c90
Loading Environment from nowhere... OK
DDC: timeout reading EDID
DDC: timeout reading EDID
DDC: timeout reading EDID
Setting up a 720x576i composite-pal console (overscan 32x20)
In:    serial,usbkbd
Out:   serial,vidconsole
Err:   serial,vidconsole
Allwinner mUSB OTG (Peripheral)
Net:   using musb-hdrc, OUT ep1out IN ep1in STATUS ep2in
MAC de:ad:be:ef:00:01
HOST MAC de:ad:be:ef:00:00
RNDIS ready
eth0: usb_ether

starting USB...
USB EHCI 1.00
USB OHCI 1.0
Bus usb@1c14000: 1 USB Device(s) found
Bus usb@1c14400: 1 USB Device(s) found
       scanning usb for storage devices... 0 Storage Device(s) found
Hit any key to stop autoboot: 0
=>
If you're not hitting the "any" key fast enough, U-Boot is going into it's auto-boot loop. Don't worry that doesn't cause any damage. You'll just have to sit it out. Eventually you'll end up with an interactive prompt and can go explore. CHIP's USB port seems to be detected. However, then NAND is not. We'll get to that later. For now, we've shown we can boot into a recent U-Boot release which is already great.
Linux
Download and unpack the latest Linux LTS kernel:
export LINUX_VER=6.12.66
wget -c -P download https://cdn.kernel.org/pub/linux/kernel/v6.x/linux-${LINUX_VER}.tar.xz
tar x -C build -f download/linux-${LINUX_VER}.tar.xz
Let's try building with the sunxi_defconfig which can be found in
linux-${LINUX_VER}/arch/arm/configs:
pushd build/linux-${LINUX_VER}
ARCH=arm CROSS_COMPILE=arm-linux-gnueabihf- make sunxi_defconfig
ARCH=arm CROSS_COMPILE=arm-linux-gnueabihf- make -j$(nproc) zImage
ARCH=arm CROSS_COMPILE=arm-linux-gnueabihf- make -j$(nproc) dtbs
popd
OK, now let's boot into Linux:
pushd build
sunxi-fel -v uboot u-boot-v${UBOOT_VER}/u-boot-sunxi-with-spl.bin \
          write 0x42000000 linux-${LINUX_VER}/arch/arm/boot/zImage \
          write 0x43000000 linux-${LINUX_VER}/arch/arm/boot/dts/allwinner/sun5i-r8-chip.dtb
popd
In the cu terminal window type:
bootz 0x42000000 - 0x43000000
and you should see Linux trying to boot:
Kernel image @ 0x42000000 [ 0x000000 - 0x4eb9f8 ]
## Flattened Device Tree blob at 43000000
   Booting using the fdt blob at 0x43000000
Working FDT set to 43000000
   Loading Device Tree to 49ff8000, end 49fff5f8 ... OK
Working FDT set to 49ff8000

Starting kernel ...

[    0.000000] Booting Linux on physical CPU 0x0
and then fail because we don't have a rootfs yet:
[    1.428767]  unwind_backtrace from show_stack+0x10/0x14
[    1.434031]  show_stack from dump_stack_lvl+0x40/0x4c
[    1.439103]  dump_stack_lvl from panic+0x108/0x314
[    1.443911]  panic from mount_block_root+0x168/0x208
[    1.448906]  mount_block_root from prepare_namespace+0x150/0x18c
[    1.454939]  prepare_namespace from kernel_init+0x18/0x12c
[    1.460445]  kernel_init from ret_from_fork+0x14/0x28
[    1.465514] Exception stack(0xde811fb0 to 0xde811ff8)
[    1.470578] 1fa0:                                     00000000 00000000 00000000 00000000
[    1.478767] 1fc0: 00000000 00000000 00000000 00000000 00000000 00000000 00000000 00000000
[    1.486955] 1fe0: 00000000 00000000 00000000 00000000 00000013 00000000
[    1.493588] ---[ end Kernel panic - not syncing: VFS: Unable to mount root fs on unknown-block(0,0) ]---
Exciting times! We've just run the latest Linux LTS (for one second or so)!
Busybox Rootfs
The above attempt to boot into Linux failed because we did not have a root filesystem (rootfs). Let's build one using Busybox!
Download Busybox
export BUSYBOX_VER=1.36.1
wget -c -P download https://busybox.net/downloads/busybox-${BUSYBOX_VER}.tar.bz2
tar x -C build -f download/busybox-${BUSYBOX_VER}.tar.bz2
Configure & Compile:
pushd build/busybox-${BUSYBOX_VER}
ARCH=arm CROSS_COMPILE=arm-linux-gnueabihf- make defconfig

sed -e 's/# CONFIG_STATIC is not set/CONFIG_STATIC=y/' -i .config
sed -e 's/CONFIG_TC=y/# CONFIG_TC is not set/' -i .config
sed -e 's/CONFIG_FEATURE_TC_INGRESS=y/# CONFIG_FEATURE_TC_INGRESS is not set/' -i .config

ARCH=arm CROSS_COMPILE=arm-linux-gnueabihf- make -j$(nproc)
rm -rf ../rootfs
mkdir -p ../rootfs
ARCH=arm CROSS_COMPILE=arm-linux-gnueabihf- make CONFIG_PREFIX=../rootfs install
popd
Finalize initramfs:
cat > build/rootfs/init << EOF
#!/bin/sh
mount -t proc none /proc
mount -t sysfs none /sys
exec /bin/sh
EOF
chmod a+x build/rootfs/init

fakeroot -- /bin/bash -c '\
    cd build/rootfs; \
    mkdir -p dev etc home mnt proc sys
    for i in `seq 1 6`; do \
        mknod dev/tty$i c 4 1; \
    done; \
    mknod dev/console c 5 1; \
    find . |cpio -o -H newc |gzip >../rootfs.cpio.gz; \
'
build/u-boot-v${UBOOT_VER}/tools/mkimage -A arm -O linux -T ramdisk -C gzip -d build/rootfs.cpio.gz build/rootfs.cpio.gz.uboot
Now that we have a root file system, we can download it to CHIP's RAM and boot into it:
sunxi-fel -v uboot build/u-boot-v${UBOOT_VER}/u-boot-sunxi-with-spl.bin \
  write 0x42000000 build/linux-${LINUX_VER}/arch/arm/boot/zImage \
  write 0x43000000 build/linux-${LINUX_VER}/arch/arm/boot/dts/allwinner/sun5i-r8-chip.dtb \
  write 0x43400000 build/rootfs.cpio.gz.uboot
In the cu terminal window type:
bootz 0x42000000 0x43400000 0x43000000
Buildroot
In the Warm-Up exercise chapter we've manually installed a cross-compiler, downloaded the U-Boot, Linux and Busybox sources, compiled them and created a rootfs image. In this chapter we are going to use Buildroot to do that for us.
Buildroot is a great tool to generate embedded Linux images. It integrates all of the steps mentioned above and makes it really easy to add various software packages to the root file system.
We can only give very brief overview of how to use Buildroot for our purposes. Luckily, Buildroot comes with detailed documentation that should cover everything important to know.
First the versions of Linux Kernel, U-Boot and Buildroot are exported as environment variables, along with some directory definitions:
# set U-Boot version
export UBOOT_VER=
LATEST_TAG=$( curl -s "https://gitlab.com/api/v4/projects/u-boot%2Fu-boot/repository/tags?order_by=version&sort=desc" \
  | jq -r '[ .[] | select(.name | test("-rc") | not) ][0].name'
)

# Retrieve latest Linux version
export LINUX_VER=$(curl -s https://www.kernel.org/releases.json | jq -r '
    [ .releases[] | select(.moniker=="longterm") | .version ]
    | sort_by(split(".") | map(tonumber)) | last
')

# set Buildroot version
export BR_VER=2025.02.10

# define working dir - use absolute paths!
export WORK_DIR="${HOME}/Projects/CHIP-BUILDROOT-${BR_VER}"
export DOWNLOAD_DIR="${WORK_DIR}/download"
export BR_DIR="${WORK_DIR}/buildroot-${BR_VER}"
export BR2_EXTERNAL="${WORK_DIR}/buildroot-external"
Now create the working directories and download Buildroot:
mkdir -p ${WORK_DIR}
mkdir -p ${DOWNLOAD_DIR}
mkdir -p "${BR2_EXTERNAL}"

echo "# Downloading Buildroot"
wget -c -P "${DOWNLOAD_DIR}" https://buildroot.org/downloads/buildroot-${BR_VER}.tar.gz
tar -C "${WORK_DIR}" -x -f "${DOWNLOAD_DIR}/buildroot-${BR_VER}.tar.gz"
Customizing Buildroot for CHIP
We are going to use the 'br2-external' mechanism (c.f. Buildroot documentation
Chapter 9.2
) in order to keep our customizations outside of the official Buildroot tree.
All customizations to Buildroot go into an external directory defined in the BR2_EXTERNAL variable.
Create external.desc:
cat <<EOF >"${BR2_EXTERNAL}"/external.desc
name: CHIP
desc: Buildroot configuration for CHIP
EOF
Create external.mk:
cat <<EOF >"${BR2_EXTERNAL}"/external.mk
include \$(sort \$(wildcard \$(BR2_EXTERNAL_CHIP_PATH)/package/*/*.mk))
EOF
Create empty Config.in:
touch "${BR2_EXTERNAL}"/Config.in
Create recommended directory structure:
mkdir -p "${BR2_EXTERNAL}"/board/nextthingco/CHIP/{dts,linux,uboot}
mkdir -p "${BR2_EXTERNAL}"/configs
Create Buildroot configuration for CHIP, for now using the default U-Boot
CHIP_defconfig and Linux sunxi_defconfig:
cat <<EOF >"${BR2_EXTERNAL}"/configs/nextthingco_chip_defconfig
BR2_arm=y
BR2_cortex_a8=y
BR2_TOOLCHAIN_EXTERNAL=y
BR2_LINUX_KERNEL=y
BR2_LINUX_KERNEL_CUSTOM_VERSION=y
BR2_LINUX_KERNEL_CUSTOM_VERSION_VALUE="${LINUX_VER}"
BR2_LINUX_KERNEL_PATCH="\${BR2_EXTERNAL_CHIP_PATH}/board/nextthingco/CHIP/linux"
BR2_LINUX_KERNEL_DEFCONFIG="sunxi"
BR2_LINUX_KERNEL_DTS_SUPPORT=y
BR2_LINUX_KERNEL_INTREE_DTS_NAME="allwinner/sun5i-r8-chip"
BR2_LINUX_KERNEL_DTB_OVERLAY_SUPPORT=y
BR2_LINUX_KERNEL_INSTALL_TARGET=y
BR2_TARGET_ROOTFS_CPIO=y
BR2_TARGET_ROOTFS_CPIO_GZIP=y
BR2_TARGET_ROOTFS_CPIO_UIMAGE=y
BR2_TARGET_UBOOT=y
BR2_TARGET_UBOOT_BUILD_SYSTEM_KCONFIG=y
BR2_TARGET_UBOOT_CUSTOM_VERSION=y
BR2_TARGET_UBOOT_CUSTOM_VERSION_VALUE="${UBOOT_VER}"
BR2_TARGET_UBOOT_PATCH="\${BR2_EXTERNAL_CHIP_PATH}/board/nextthingco/CHIP/uboot"
BR2_TARGET_UBOOT_BOARD_DEFCONFIG="CHIP"
BR2_TARGET_UBOOT_NEEDS_DTC=y
BR2_TARGET_UBOOT_NEEDS_PYLIBFDT=y
BR2_TARGET_UBOOT_SPL=y
BR2_TARGET_UBOOT_SPL_NAME="u-boot-sunxi-with-spl.bin spl/sunxi-spl.bin"
EOF
Now compile Linux, U-Boot and build a rootfs image using Buildroot:
cd "${BR_DIR}"
make nextthingco_chip_defconfig
make
Buildroot put everything into the output/images sub-directory.
The following commands are booting into U-Boot SPL and then upload the Linux
kernel, the device tree and the Buildroot root file system into CHIP's DRAM:
cd "${BR_DIR}/output/images"
sunxi-fel -v -p uboot u-boot-sunxi-with-spl.bin \
                write 0x42000000 zImage \
                write 0x43000000 sun5i-r8-chip.dtb \
                write 0x50000000 rootfs.cpio.uboot
NOTE: We are uploading the root file system to address 0x50000000 now.
If the rootfs gets bigger we might get into trouble uploading it into the
memory region between 0x4300000000 and 0x4fffffff.
Read the Sunxi website and
this post
for more details.
To boot, type the following in the cu terminal window:
bootz 0x42000000 0x50000000 0x43000000
NAND Support
Thanks to Boris Brezillon, Linux supports the Toshiba NAND used on some CHIPs in emulated SLC mode since version 5.8. Chris Morgan added SLC mode support for the Hynix NAND on the original CHIP in Linux version 5.16.
Unfortunately, U-Boot at the time of writing does not support the NAND memory on CHIP out of the box. However, Chris Morgan also provides patches for U-Boot v2022.01 in his chip-debroot repository on Github.
In this chapter we'll first setup Linux to use CHIP's NAND in SLC mode, then switch to the patched version of U-Boot 2022.01 which supports the NAND in SLC mode.
Access the NAND from Linux
Linux Configuration
So far, we have used the sunxi_defconfig in the Linux tree.
Now, we are creating a Linux kernel config fragment to enable the Memory
Technology Device (MTD) drivers, support for raw NAND and the Allwinner NAND
controller as well as UBI/UBIFS. Type:
cat <<EOF >"${BR2_EXTERNAL}"/board/nextthingco/CHIP/linux/nand.cfg
CONFIG_MTD=y
CONFIG_MTD_CMDLINE_PARTS=y
CONFIG_MTD_RAW_NAND=y
CONFIG_MTD_NAND_SUNXI=y
CONFIG_MTD_UBI=y
CONFIG_MISC_FILESYSTEMS=y
CONFIG_UBIFS_FS=y
EOF
The device tree for CHIP included in the Linux source does not enable the NAND.
We need to create a patch that we place in buildroot-external/board/nextthingco/CHIP/sun5i-r8-chip.dts.nand.patch:
cat <<EOF |sed -e 's/^ / \t/; s/ /\t/g; s/+ $/+/g' >${BR2_EXTERNAL}/board/nextthingco/CHIP/linux/sun5i-r8-chip.dts.nand.patch
--- a/arch/arm/boot/dts/allwinner/sun5i-r8-chip.dts 2026-02-11 22:47:01.214772251 +0100
+++ b/arch/arm/boot/dts/allwinner/sun5i-r8-chip.dts 2026-02-11 22:48:26.003942388 +0100
@@ -280,3 +280,44 @@
usb0_vbus-supply = <®_usb0_vbus>;
usb1_vbus-supply = <®_vcc5v0>;
};
+
+&nfc {
+ pinctrl-names = "default";
+ pinctrl-0 = <&nand_pins &nand_cs0_pin &nand_rb0_pin>;
+ status = "okay";
+
+ nand@0 {
+ #address-cells = <2>;
+ #size-cells = <2>;
+ reg = <0>;
+ allwinner,rb = <0>;
+ nand-ecc-mode = "hw";
+ nand-ecc-maximize;
+ nand-on-flash-bbt;
+ spl@0 {
+ label = "SPL";
+ reg = /bits/ 64 <0x0 0x400000>;
+ };
+
+ spl-backup@400000 {
+ label = "SPL.backup";
+ reg = /bits/ 64 <0x400000 0x400000>;
+ };
+
+ u-boot@800000 {
+ label = "U-Boot";
+ reg = /bits/ 64 <0x800000 0x400000>;
+ };
+
+ env@c00000 {
+ label = "env";
+ reg = /bits/ 64 <0xc00000 0x400000>;
+ };
+
+ rootfs@1000000 {
+ label = "rootfs";
+ reg = /bits/ 64 <0x1000000 0x1ff000000>;
+ slc-mode;
+ };
+ };
+};
EOF
NOTE: We are hardcoding 5 partitions here: spl (4MB), spl-backup (4MB), u-boot (4MB), env (4MB) and rootfs (remaining space, slc-mode).
Buildroot is going to automatically apply the patch the next time we build.
Let us add some file system utilities to our target rootfs and also let Buildroot know that it should merge-in our Linux configuration fragment:
cat <<EOF >>"${BR2_EXTERNAL}"/configs/nextthingco_chip_defconfig
BR2_PACKAGE_MTD=y
BR2_PACKAGE_MTD_MKFSUBIFS=y
BR2_LINUX_KERNEL_CONFIG_FRAGMENT_FILES="\${BR2_EXTERNAL}/board/nextthingco/CHIP/linux/nand.cfg"
EOF
It is time to build our new Buildroot configuration:
cd "${BR_DIR}"
make nextthingco_chip_defconfig;
make linux-rebuild
make
Boot into our new OS image:
cd ${BR_DIR}/output/images
sunxi-fel -v -p uboot u-boot-sunxi-with-spl.bin \
                write 0x42000000 zImage \
                write 0x43000000 sun5i-r8-chip.dtb \
                write 0x50000000 rootfs.cpio.uboot
In U-Boot, boot:
bootz 0x42000000 0x50000000 0x43000000
After logging in to Linux, format the root partition on the NAND and copy the rootfs from the ram disk:
mtdinfo
mtdinfo /dev/mtd0
flash_erase /dev/mtd4 0 2035
ubiformat -y /dev/mtd4
ubiattach -m 4                           # --> generates /dev/ubi0, also displays number of LEBs = e.g. 1952
ubimkvol /dev/ubi0 --name rootfs -S 1952 # --> creates /dev/ubi0_0
mkfs.ubifs /dev/ubi0_0                   # --> doesn't really create ubifs
mount -t ubifs /dev/ubi0_0 /mnt          # --> ubifs is created as part of mounting
cp -va /bin /boot /crond.reboot /dev /etc /init /lib /lib32 /linuxrc /media /opt /root /sbin /usr /var /mnt # --> copy stuff from ramdisk to nand
cd /mnt
mkdir mnt run proc sys tmp
cd /
umount /mnt
reboot
NOTE: leaving out the mkfs.ubifs /dev/ubi0_0 step above seems to work fine as long as only Linux is involved.
However, we won't be able to mount the ubifs partition from U-Boot without!
In the U-Boot terminal type:
bootz 0x42000000 0x50000000 0x43000000
In Linux, we now can read from NAND after reboot:
ubiattach -m 4                           # --> generates /dev/ubi0
mount -t ubifs /dev/ubi0_0 /mnt          # --> ubifs is created as part of mounting
find /mnt
Access the NAND from U-Boot
The patches from Chris Morgan are for U-Boot v2022.01.
For simplicity, we are going to switch to that version as it allows us to
use the unmodified patches.
So let's update the Buildroot configuration to use U-Boot v2022.01 and also add a
nand.cfg configuration fragment for U-Boot:
export UBOOT_VER=2022.01

sed -i -e '
s/\(BR2_TARGET_UBOOT_CUSTOM_VERSION_VALUE=\).*/\1\"'$UBOOT_VER'\"/;
' ${BR2_EXTERNAL}/configs/nextthingco_chip_defconfig

cat <<EOF >>${BR2_EXTERNAL}/configs/nextthingco_chip_defconfig
BR2_TARGET_UBOOT_CONFIG_FRAGMENT_FILES="\${BR2_EXTERNAL}/board/nextthingco/CHIP/uboot/nand.cfg"
EOF

cd ${BR_DIR}
make nextthingco_chip_defconfig
Download patches to enable SLC mode for the NAND:
wget -c -P ${BR2_EXTERNAL}/board/nextthingco/CHIP/uboot https://raw.githubusercontent.com/macromorgan/chip-debroot/main/u-boot_files/0001-sunxi-Add-support-for-slc-emulation-on-mlc-NAND.patch
wget -c -P ${BR2_EXTERNAL}/board/nextthingco/CHIP/uboot https://raw.githubusercontent.com/macromorgan/chip-debroot/main/u-boot_files/0001-sunxi-nand-Undo-removal-of-DMA-specific-code-that-br.patch
Create the nand.cfg for U-Boot:
cat <<EOF >${BR2_EXTERNAL}/board/nextthingco/CHIP/uboot/nand.cfg
CONFIG_CMD_MTDPARTS=y
CONFIG_CMD_UBI=y
CONFIG_CMD_UBIFS=y
CONFIG_MTDIDS_DEFAULT="nand0=nand0"
CONFIG_MTDPARTS_DEFAULT="nand0:0x400000(SPL),0x400000(SPL.backup),0x400000(U-Boot),0x400000(U-Boot.backup),-(rootfs)slc"
CONFIG_MTD=y
CONFIG_DM_MTD=y
CONFIG_MTD_RAW_NAND=y
CONFIG_SYS_NAND_USE_FLASH_BBT=y
CONFIG_NAND_SUNXI_SPL_ECC_SIZE=512
CONFIG_SYS_NAND_BLOCK_SIZE=0x400000
CONFIG_SYS_NAND_PAGE_SIZE=0x4000
CONFIG_SYS_NAND_OOBSIZE=0x680
CONFIG_SYS_NAND_U_BOOT_OFFS_REDUND=0xc00000
CONFIG_UBI_SILENCE_MSG=y
EOF
Build new configured U-Boot:
make uboot-reconfigure
Next, boot - note: we are not uploading Linux anymore:
cd ${BR_DIR}/output/images
sunxi-fel -v -p uboot u-boot-sunxi-with-spl.bin
In our cu-terminal, hit the Any-Key and type the following U-Boot commands:
ubi part rootfs
ubifsmount ubi0:rootfs
ubifsload 0x42000000 /boot/zImage
ubifsload 0x43000000 /boot/sun5i-r8-chip.dtb
setenv bootargs root=ubi0_0 rootfstype=ubifs ubi.mtd=4 rw earlyprintk waitroot
bootz 0x42000000 - 0x43000000
NOTE: for some reason setenv bootargs root=/dev/ubi0:rootfs rootfstype=ubifs ubi.mtd=4 rw earlyprintk waitroot
does not work. That's why we specify root=ubi0_0.
Woohoo! We've just booted the Linux kernel and device tree U-Boot loaded from NAND. And Linux mounted its rootfs from NAND! In the next chapter, we are going to show how to also write U-Boot onto the NAND such that CHIP can boot without using a USB connection and the sunxi-fel tool.
Booting from NAND
Instead of booting into FEL mode and downloading U-Boot, Linux and the root file system every time, we want to load everything from the NAND and boot into Linux automatically when we turn on C.H.I.P.
When powered on, the Allwinner R8 SOC on C.H.I.P first executes code in the
built-in Boot-ROM (BROM).
At this time the 512 MB DRAM on C.H.I.P are not initialized and the R8 SOC can
only work with the internal 48 KiB SRAM.
The BROM code checks if the FEL pin is low (i.e. connected to GND) and if so
goes to the FEL USB boot mode. With the R8 in FEL USB mode, we can interact
with the SOC via the sunxi-fel tool as described various times in the previous
chapters.
If the FEL pin is high, the BROM code starts checking the various storage
options (e.g. C.H.I.P's NAND) for a valid boot signature at the right location.
If no boot signature is found the BROM code switches to FEL mode.
If such a boot signature is found the code is loaded from the storage into the
SRAM and executed.
The maximum size of this early stage boot code is 0x7e00 bytes (31.5 KiB) on
Allwinner R8/A13 SOCs.
The limited space in the SRAM is why we need the U-Boot secondary program loader (SPL). We've already used U-Boot SPL in the first chapters without explaining anything about it. Without going into detail, the following paragraph tries to gives a very high level (and probably too simplified) overview.
We used the sunxi-fel uboot command that expects a binary containing U-Boot
including the SPL code. The SPL code is downloaded to the SRAM of the SOC
and executed to initialize the DRAM. C.H.I.P's DRAM configuration is hard-coded
in the SPL. After initializing the DRAM, the SOC goes back to FEL mode.
Now U-Boot, Linux, the device tree and the root file filesystem can be
downloaded to DRAM by the sunxi-fel tool.
Next, U-Boot is executed and unpacks and starts the Linux kernel.
In this chapter we want to write the SPL code to the first blocks of the NAND where it can be picked up and executed by the BROM code. Once the DRAM is initialized, we want the SPL code to read the full U-Boot code from the NAND into DRAM and then hand over control to U-Boot. For that to work, not only the DRAM configuration but also the NAND configuration must be hardcoded into the SPL code. The DRAM and NAND parameters are specified in the the U-Boot configuration.
Different NAND types
NAND memory device technology is used inside of SD card, SSD's and EMMC chips which behave like block devices. These block devices abstract away many of the things necessary to operate the underlying raw NAND. C.H.I.P does not use SD cards or EMMC chips, but comes with a raw NAND chip. This requires special treatment in software to implement error correction and wear-leveling.
There are two different variants of C.H.I.P out in the wild - those with
SK hynix H27UCG8T2ETR NAND modules and those with Toshiba TC58TEG5DCLTA00
NAND modules:
| SK hynix | Toshiba | |
|---|---|---|
| Part No | H27UCG8T2ETR | TC58TEG5DCLTA00 |
| Type | MLC | MLC |
| Erase Block Size | 4194304 bytes | 4194304 bytes |
| Page Size | 16384 bytes | 16384 bytes |
| Sub-Page Size | 16384 bytes | 16384 bytes |
| OOB Size | 1664 bytes | 1280 bytes |
| Max. LEB COUNT | 4096 | 4096 |
| Capacity | 8 GB | 4 GB |
Both chips are Multi-level cell "MLC" NAND chips. Compared to Single-level cell "SLC" NAND, they store multiple bits per cell resulting in a higher data density. Unfortunately, that comes at a price - they are more sensitive to errors and have a lower endurance. MLC NAND is not supported by the UBI/UBIFS layers in mainline Linux. However, the original NextThingCo Linux 4.4 branches supported MLC NAND. Both NAND chips can also be operated in an SLC mode, where only one bit per cell is stored. Only half their capacity is available for data storage as a result. Here we focus on mainline Linux and thus use the NAND in SLC mode.
NAND consists of so called "erase-blocks", which are 4 MB in size for the SK hynix and the Toshiba NAND. Whenever data is written to the NAND, a whole erase-block is erased and re-written. Even when only a single bit has changed, it is necessary to write a full erase-block. Erase-blocks wear out with a growing number of write-cycles and can become unusable, so-called "bad blocks". Wear-leveling algorithms to miminimize wear-out and bad-block handling needs to be implemented in software.
Data is read in pages of 16 KB size in our case - same for both NAND types. Each erase block consists of 256 pages (4 MB / 16 KB = 256). Pages can also be divided in sub-pages, but that is not the case for the NAND used on C.H.I.P (page size = subpage size). For every page there is a so-called out-of-band (OOB) area where error-correction-code (ECC) data is stored. So, in reality the SK hynix NAND has a page size of 16384 + 1664 = 18048 bytes of which 16384 are available for data storage. Consequently, the erase blocks are really 4620288 bytes in size with 4194304 usable bytes. For Toshiba its the real page size is 16384 + 1280 = 17664 bytes and the real erase block size is 4521984 bytes. This becomes important when we want to read from raw NAND and prepare raw NAND images for flashing.
As shown above, the SK hynix and the Toshiba NAND used on C.H.I.P differ
in their capacity and their OOB size.
In the CHIP_defconfig for U-Boot in the previous chapter we have defined OOB
size matching the SK hynix NAND module CONFIG_SYS_NAND_OOBSIZE=0x680 - as
0x680 converted to decimal is 1664.
So far this setting did not matter, as we always loaded U-Boot and it's SPL
part to C.H.I.P's RAM via the sunxi-fel tool.
But as we want the U-Boot SPL to load the rest of U-Boot from the NAND we now
have to define the correct OOB size.
So, when building the U-Boot SPL for a the Toshiba NAND, we need update the
U-Boot nand.cfg configuration fragment:
sed -i -e 's/\(CONFIG_SYS_NAND_OOBSIZE\)=.*/\1=0x500/' \
${BR2_EXTERNAL}/board/nextthingco/CHIP/uboot/nand.cfg
cd ${BR_DIR}
make uboot-reconfigure
And when we want to switch back to SK hynix NAND do this:
sed -i -e 's/\(CONFIG_SYS_NAND_OOBSIZE\)=.*/\1=0x680/' \
${BR2_EXTERNAL}/board/nextthingco/CHIP/uboot/nand.cfg
make uboot-reconfigure
SPL NAND image
The BROM code only has a very basic NAND driver implementation that does not know about the parameters of the actual NAND chip. It tries to read the SPL code from page 0 on block 0 of the NAND. If it does not find valid boot code there it continues at page 64, page 128, and page 192 on erase block 0. Then it continues with pages 256, 320, 384 and 448 on erase block 1. For maximum robustness, in total eight copies of the SPL code can be written to the NAND.
As the BROM code does not know about the size of the NAND, for each page various formats are probed - more details are explained in the linux-sunxi.org wiki.
The sunxi-nand-image-builder tool takes the sunxi-spl.bin as input and
writes an output file including scrambling and error correction codes that can be
flashed onto the raw NAND and is recognized by the BROM code.
Various formats can be selected - the most robust one only using 1024 bytes per
page plus 64 bit for error correction.
Let's add the sunxi-tools (including the sunxi-nand-image-builder) to the
Buildroot host tools and build them:
cat <<EOF >>"${BR2_EXTERNAL}"/configs/nextthingco_chip_defconfig
BR2_PACKAGE_HOST_SUNXI_TOOLS=y
EOF

cd ${BR_DIR}
make nextthingco_chip_defconfig
make host-sunxi-tools
Now we can create a BROM image for sk Hynix NAND:
cd ${BR_DIR}/output/images
${BR_DIR}/output/host/bin/sunxi-nand-image-builder -p 16384 -o 1280 -e 0x400000 -s -b -u 1024 -c 64/1024 sunxi-spl.bin sunxi-spl.bin.nand
This blows up the 16384 bytes sunxi-spl.bin into a 282624 bytes
sunxi-spl.bin.nand file. That corresponds to 282624 / (16384 + 1280) = 16
raw nand pages.
We need to prepare an image for a full erase block, so we need to add 48 pages padding and then repeat that three times:
| Page |  0  | 16  | 32  | 48  |
| ---- | --- | --- | --- | --- |
|   0  | SPL | PAD | PAD | PAD |
|  64  | SPL | PAD | PAD | PAD |
| 128  | SPL | PAD | PAD | PAD |
| 192  | SPL | PAD | PAD | PAD |
Buildroot supports a so-called post-image script.
The post-image script is executed after U-Boot, Linux and the rootfs have been
built.
Let's add a post-image.sh script to our Buildroot configuration:
cat <<EOF >>"${BR2_EXTERNAL}"/configs/nextthingco_chip_defconfig
BR2_ROOTFS_POST_IMAGE_SCRIPT="\${BR2_EXTERNAL_CHIP_PATH}/board/nextthingco/CHIP/post-image.sh"
EOF

cd ${BR_DIR}
make nextthingco_chip_defconfig
The following post-image.sh script takes the U-Boot sunxi-spl.bin as input a
produces a sunxi-spl.bin.nand image with all the error correction, repetition
of the SPL and padding:
cat <<EOF >${BR2_EXTERNAL}/board/nextthingco/CHIP/post-image.sh
#!/bin/bash

# Environment variables passed in from buildroot:
# BR2_CONFIG, HOST_DIR, STAGING_DIR, TARGET_DIR, BUILD_DIR, BINARIES_DIR and BASE_DIR.

echo "##############################################################################"
echo "## \$0 "
echo "##############################################################################"

echo "# \\\$1 = \$1"
echo "# \\\$2 = \$2"

IFS=", " read -r -a EXTRA_ARGS <<< "\$2"

echo "# BR2_CONFIG=\$BR2_CONFIG"
echo "# BR2_EXTERNAL=\$BR2_EXTERNAL"
echo "# HOST_DIR=\$HOST_DIR"
echo "# STAGING_DIR=\$STAGING_DIR"
echo "# TARGET_DIR=\$TARGET_DIR"
echo "# BUILD_DIR=\$BUILD_DIR"
echo "# BINARIES_DIR=\$BINARIES_DIR"
echo "# BASE_DIR=\$BASE_DIR"

ROOT_DIR="\${BR2_EXTERNAL_CHIP_PATH}"

# Read U-Boot version and config file from the Buildroot configuration
UBOOT_VER="\$(sed -n -e 's/BR2_TARGET_UBOOT_VERSION="\([^"]*\)"/\1/p' \$BR2_CONFIG)"
UBOOT_CFG="\${BUILD_DIR}/uboot-${UBOOT_VER}/.config"
[ ! -f "\${UBOOT_CFG}" ] && echo "ERROR: cannot find U-Boot config $UBOOT_CFG" && exit 1

# Read NAND parameters from the U-Boot configuration
BLOCK_SIZE="\$(sed -n -e 's/CONFIG_SYS_NAND_BLOCK_SIZE=\(.*\)/\1/p' \$UBOOT_CFG)"
PAGE_SIZE="\$(sed -n -e 's/CONFIG_SYS_NAND_PAGE_SIZE=\(.*\)/\1/p' \$UBOOT_CFG)"

OOB_SIZE_TOSHIBA=1280
OOB_SIZE_HYNIX=1664

INPUT_SPL="\${BINARIES_DIR}/sunxi-spl.bin"
OUTPUT_SPL="\${BINARIES_DIR}/sunxi-spl.bin.ecc"

OUTPUT_IMAGE_HYNIX="\${BINARIES_DIR}/sunxi-spl.bin.hynix.nand"
OUTPUT_IMAGE_TOSHIBA="\${BINARIES_DIR}/sunxi-spl.bin.toshiba.nand"

function create_image()
{
    OUTPUT_IMAGE="\${1}"
    OOB_SIZE="\${2}"
    rm -rf "\${OUTPUT_IMAGE}"
    for i in \$(seq 1 16)
    do
            \${HOST_DIR}/bin/sunxi-nand-image-builder -s -b -c 64/1024 -u 1024 -e \${BLOCK_SIZE} -p \${PAGE_SIZE} -o \${OOB_SIZE} \${INPUT_SPL} \${OUTPUT_SPL}
            cat "\${OUTPUT_SPL}" >> "\${OUTPUT_IMAGE}"
    done
}

create_image "\${OUTPUT_IMAGE_HYNIX}" "\${OOB_SIZE_HYNIX}"
create_image "\${OUTPUT_IMAGE_TOSHIBA}" "\${OOB_SIZE_TOSHIBA}"

EOF
chmod a+x ${BR2_EXTERNAL}/board/nextthingco/CHIP/post-image.sh
NOTE: instead of padding random data we simply generate BROM image 16 times.
Each time the output is different, as the sunxi-nand-image-builder mixes in
random data for robustnes on the NAND. So effectively the post image script
creates a full erase block with the following content:
| Page |  0  | 16  | 32  | 48  |
| ---- | --- | --- | --- | --- |
|   0  | SPL | SPL | SPL | SPL |
|  64  | SPL | SPL | SPL | SPL |
| 128  | SPL | SPL | SPL | SPL |
| 192  | SPL | SPL | SPL | SPL |
The resulting ${BR_DIR}/output/images/sunxi-spl.bin.hynix.nand (or
${BR_DIR}/output/images/sunxi-spl.bin.toshiba.nand) can now be flashed to the
first two erase blocks of the NAND.
Full U-Boot image
The SPL image is created using the sunxi-nand-image-builder which implements
randomization and ECC necessary to achieve the greates possible reliablity.
This is not necessary for the full U-Boot image as the NAND controller of the
R8 / A13 SOC is taking care of that when writing the image.
We can simply use the dd command to create an image:
dd if=${BR_DIR}/output/image/u-boot.bin of=${BR_DIR}/output/image/u-boot.bin.nand bs=${BLOCK_SIZE} conv=sync
Note, the resulting u-boot-bin.nand image is excactly 4 MB - the size of the
NAND erase blocks.
For future use, also add this to our post-image.sh script:
# Read NAND parameters from the U-Boot configuration
cat <<EOF >>${BR2_EXTERNAL}/board/nextthingco/CHIP/post-image.sh
INPUT_IMAGE="\${BINARIES_DIR}/u-boot.bin"
OUTPUT_IMAGE="\${BINARIES_DIR}/u-boot.bin.nand"
dd if="\${INPUT_IMAGE}" of="\${OUTPUT_IMAGE}" bs=\$(printf "%d" \${BLOCK_SIZE}) conv=sync
EOF
Write SPL, U-Boot and Linux rootfs to the NAND
Type the following to download SPL, U-Boot, the Linux kernel, our DTB, the NAND images and the rootfs to C.H.I.P's DRAM and boot:
D=${BR_DIR}/output/images

sunxi-fel -v -p uboot ${D}/u-boot-sunxi-with-spl.bin \
                write 0x42000000 ${D}/zImage \
                write 0x43000000 ${D}/sun5i-r8-chip.dtb \
                write 0x43400000 ${D}/sunxi-spl.bin.hynix.nand \
                write 0x43800000 ${D}/u-boot.bin.nand \
                write 0x50000000 ${D}/rootfs.cpio.uboot
Via UART, interrupt U-Boot's auto-boot mechanism, and type the following commands in order to write the SPL and U-Boot images to the NAND and then boot into to the Linux Ramdisk:
nand erase.chip
nand write.raw.noverify 0x43400000 0x0 0x100
nand write.raw.noverify 0x43400000 0x400000 0x100
nand write 0x43800000 0x800000 0x400000
bootz 0x42000000 0x50000000 0x43000000
In Linux, run these commands to create the UBIFS on the NAND rootfs partition and then copy the rootfs from the ramdisk to the NAND.
mtdinfo
mtdinfo /dev/mtd0
flash_erase /dev/mtd4 0 2035
ubiformat -y /dev/mtd4
ubiattach -m 4                           # --> generates /dev/ubi0, also displays number of LEBs = e.g. 1952
ubimkvol /dev/ubi0 --name rootfs -S 1952 # --> creates /dev/ubi0_0
mkfs.ubifs /dev/ubi0_0                   # --> doesn't really create ubifs
mount -t ubifs /dev/ubi0_0 /mnt          # --> ubifs is created as part of mounting
cp -va /bin /boot /crond.reboot /dev /etc /init /lib /lib32 /linuxrc /media /opt /root /sbin /usr /var /mnt # --> copy stuff from ramdisk to nand
cd /mnt
mkdir mnt run proc sys tmp
cd /
umount /mnt
poweroff
Now, remove FEL pin and power on C.H.I.P. Then interrupt U-Boot auto-boot, and type the following to boot from NAND:
ubi part rootfs
ubifsmount ubi0:rootfs
ubifsload 0x42000000 /boot/zImage
ubifsload 0x43000000 /boot/sun5i-r8-chip.dtb
setenv bootargs root=ubi0_0 rootfstype=ubifs ubi.mtd=4 rw earlyprintk waitroot
bootz 0x42000000 - 0x43000000
This still requires manual intervention on the U-Boot command line.
But: we've booted without using the sunxi-fel tool!
You have probably still connected C.H.I.P to your work station via USB to power it. Try using a power supply or a battery instead - your C.H.I.P is flashed now. The next chapter shows how to automate the flashing and how to boot C.H.I.P without typing commands manually in U-Boot via UART.
Look mom no UART!
Having C.H.I.P hooked up via UART and being able to interactively type commands in U-BOOT and is great for debugging. It becomes kind of a burden though when you need to do it to boot up your C.H.I.P. In this chapter we are adding scripts to flash your U-Boot and the Buildroot image automatically and setup everything such that C.H.I.P can boot straight into Linux without manual intervention via UART.
Enable UBIFS generation in Buildroot
First, we enable the generation of an UBIFS rootfs image in our Buildroot config:
UBOOT_NAND_CFG="buildroot-external/board/nextthingco/CHIP/uboot/nand.cfg"
NAND_BLOCK_SIZE=$(sed -n -e 's/CONFIG_SYS_NAND_BLOCK_SIZE=\(.*\)/\1/p' "${UBOOT_NAND_CFG}")
NAND_PAGE_SIZE=$(sed -n -e 's/CONFIG_SYS_NAND_PAGE_SIZE=\(.*\)/\1/p' "${UBOOT_NAND_CFG}")

MINIOSIZE="${NAND_PAGE_SIZE}"
LEB_SIZE="$(printf "0x%x" $((NAND_BLOCK_SIZE/2 - 2*NAND_PAGE_SIZE)))"

cat <<EOF >>"${BR2_EXTERNAL}"/configs/nextthingco_chip_defconfig
BR2_TARGET_ROOTFS_UBIFS=y
BR2_TARGET_ROOTFS_UBIFS_LEBSIZE=${LEB_SIZE}
BR2_TARGET_ROOTFS_UBIFS_MINIOSIZE=${MINIOSIZE}
BR2_TARGET_ROOTFS_UBIFS_MAXLEBCNT=4096
BR2_TARGET_ROOTFS_UBIFS_RT_LZO=y
BR2_TARGET_ROOTFS_UBIFS_NONE=y
BR2_TARGET_ROOTFS_UBIFS_OPTS=""
EOF

cd ${BR_DIR}
make nextthingco_chip_defconfig
Configure U-Boot to automatically boot from NAND
We are adding a nand_boot.cfg U-Boot configuration fragment in order to change
the BOOT_COMMAND such that it mounts the UBI rootfs partition on the NAND and
loads the Linux kernel and the device tree binary from
there. We also define the bootargs and finally boot into the Linux kernel:
cat <<EOF >${BR2_EXTERNAL}/board/nextthingco/CHIP/uboot/nand_boot.cfg
CONFIG_AUTOBOOT=y
CONFIG_USE_BOOTCOMMAND=y
CONFIG_BOOTCOMMAND="\
if test -n \${fel_booted} && test -n \${fel_scriptaddr}; then \
    source \${fel_scriptaddr}; \
fi; \
ubi part rootfs; ubifsmount ubi0:rootfs; ubifsload 0x42000000 /boot/zImage; ubifsload 0x43000000 /boot/sun5i-r8-chip.dtb; setenv bootargs root=ubi0_0 rootfstype=ubifs ubi.mtd=4 rw earlyprintk waitroot; bootz 0x42000000 - 0x43000000"
EOF
Now also activate the new configuration fragment:
sed -i -e '
s%\(BR2_TARGET_UBOOT_CONFIG_FRAGMENT_FILES=\).*%\1\"\${BR2_EXTERNAL}/board/nextthingco/CHIP/uboot/nand.cfg \${BR2_EXTERNAL}/board/nextthingco/CHIP/uboot/nand_boot.cfg\"%g
' ${BR2_EXTERNAL}/configs/nextthingco_chip_defconfig

make nextthingco_chip_defconfig
Then re-compile u-boot and run the post-image scripts:
make uboot-reconfigure
make
Bash script to write U-Boot onto the NAND
We are going to use the U-Boot we have built above not only to boot Linux, but
also to write the NAND images. For that to work we need to overwrite the auto
boot command we defined above by downloading a U-boot environment file to address
0x43100000 with the sunxi-fel tool. The first line in the uenv.txt file
needs to be #=uEnv:
cat <<END >${BR_DIR}/output/images/flash.sh
#!/bin/bash

if [ -z "\${BR_DIR}" ]; then
    D="\${PWD}"
else
    D="\${BR_DIR}/output/images"
fi

U_BOOT_SUNXI_WITH_SPL="\${D}/u-boot-sunxi-with-spl.bin"
UENV_TXT="\${D}/uenv.txt"
SUNXI_SPL_BIN_HYNIX_NAND="\${D}/sunxi-spl.bin.hynix.nand"
SUNXI_SPL_BIN_TOSHIBA_NAND="\${D}/sunxi-spl.bin.toshiba.nand"
U_BOOT_BIN_NAND="\${D}/u-boot.bin.nand"
ROOTFS_UBIFS="\${D}/rootfs.ubifs"

ROOTFS_UBIFS_SIZE=\$(stat -c%s "\${ROOTFS_UBIFS}")
ROOTFS_UBIFS_SIZE=\$(printf "0x%x" \${ROOTFS_UBIFS_SIZE})

cat <<EOF >"\${UENV_TXT}"
#=uEnv
bootdelay=0
bootcmd=\
nand erase.chip; \
if itest.b *0x1c03035 == 40; then \
  echo "Toshiba NAND Detected"; \
  env set spl_img 0x44000000; \
fi; \
if itest.b *0x1c03035 == 60; then \
  echo "Hynix NAND Detected"; \
  env set spl_img 0x43000000; \
fi; \
nand write.raw.noverify \\\${spl_img} SPL 0x100; \
nand write.raw.noverify \\\${spl_img} SPL.backup 0x100; \
nand write 0x45000000 U-Boot 0x400000; \
nand write 0x45000000 U-Boot.backup 0x400000; \
ubi part rootfs; \
ubi createvol rootfs; \
ubi writevol 0x50000000 rootfs \${ROOTFS_UBIFS_SIZE}; \
reset
EOF

echo "# please connect CHIP with FEL-pin pulled low"
while ! sunxi-fel ver >/dev/null 2>&1; do sleep 0.5; done

sunxi-fel -v -p \
    uboot "\${U_BOOT_SUNXI_WITH_SPL}" \
    write 0x42000000 "\${UENV_TXT}" \
    write 0x43000000 "\${SUNXI_SPL_BIN_HYNIX_NAND}" \
    write 0x44000000 "\${SUNXI_SPL_BIN_TOSHIBA_NAND}" \
    write 0x45000000 "\${U_BOOT_BIN_NAND}" \
    write 0x50000000 "\${ROOTFS_UBIFS}"

echo "# flashing..."
while ! sunxi-fel ver >/dev/null 2>&1; do sleep 0.5; done
echo "# done!"
echo
echo "# please pull FEL pin high (remove cable connected to GND) and power-cycle CHIP"

END
chmod a+x ${BR_DIR}/output/images/flash.sh
Note: in the U-Boot bootcmd defined above we do a trick to find out the NAND
type. We first erase the NAND. After doing that we can read from memory address
0x1c03035 which returns 40 for the Toshiba and 60 for the Hynix NAND.
It does not work without erasing the NAND first.
(Learned this from Chris Morgan's flashing scripts).